這週要聊的是ExpandableListView(雙層清單)之~~長按顯示操作選擇菜單的作法(`・ω・´)+
像這樣
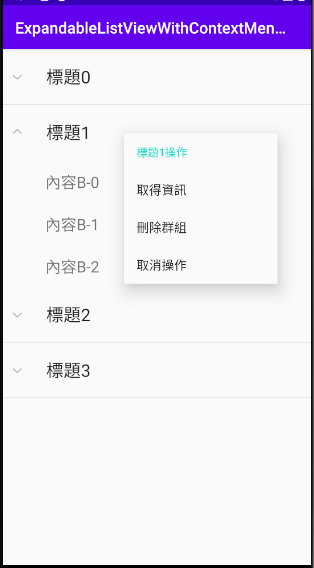
我在之前的文章,有曾經講過ExpandableListView的用法
在這邊
->碼農日常-『Android studio』ExpandableListView(抽屜式列表、可展開式ListView)之基本用法
閒聊一下,其實後來回頭看
我的程式寫得好爛RRRRRRRR(´・д・`)(´・д・`)(´・д・`)(´・д・`)
現在回頭來看是覺得當時程式真的寫得很不好QQ
但是人本來就是會進步的,往好的方面看吧(・`ω´・)
閒聊一下,其實今天在寫這篇的時候,原先想要用跟前面那篇ExpandableListView使用一樣(接近)的方法撰寫
而其用意是讓新手們跟當初的我一樣可以看得懂程式,希望你們可以直接複製我的程式拿去用
但是後來想了很久,還是決定用稍微比較"聰明"的方法處理
所以今天的文章會用跟前面那篇有點不一樣的作法處理(但其實是真正大多數人用的方法...),不會很難的,就算是初學者也可以輕易理解哦 :)
閒聊到這邊,那就展示一下今天的功能吧(´・з・)
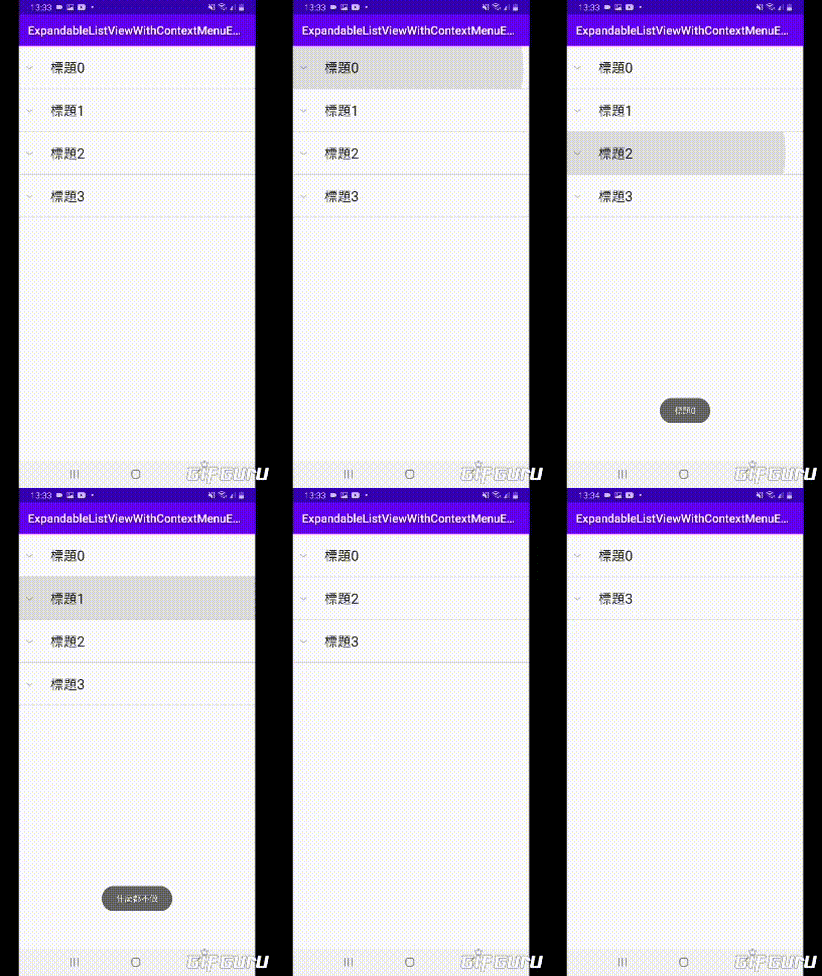
簡述一下,今天的實作就是要長按點擊ExpandableListView的item時(以下都簡稱item)時
會顯示像這樣 的功能操作視窗
而我也沒打算呼攏你~我也會連同點擊後的事件處理一起寫哦,請放100個心XDD
那麼,今天的介紹要開始了,一起加油!(*゚ー゚)ゞ
1.檢視所需要的類別與介面
首先來檢視一下今天要用材料
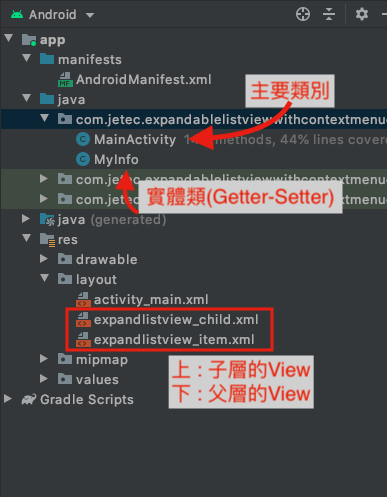
今天所需要的內容為
1.主要類別MainActivity.java
2.實體類(我之前都稱呼為Getter-Setter...後來才知道中文稱呼為實體類別,英文為Entity)
3.主畫面activity_main.xml
4.雙層清單中子層的View-expandlistview_child.xml
5.雙層清單中父層的View-expandlistview_item.xml
以上五個需要準備的
因此,就來創建這些項目吧!
2.創建實體類別與介面
2-1.創建介面
介面有三個,分別是主介面以及雙層清單要用的父item及子item
三個View就直接丟上來吧o(メ・・)=日☆
<?xml version="1.0" encoding="utf-8"?>
<androidx.constraintlayout.widget.ConstraintLayout xmlns:android="http://schemas.android.com/apk/res/android"
    xmlns:app="http://schemas.android.com/apk/res-auto"
    xmlns:tools="http://schemas.android.com/tools"
    android:layout_width="match_parent"
    android:layout_height="match_parent"
    tools:context=".MainActivity">

    <ExpandableListView
        android:id="@+id/expandListView"
        android:layout_width="match_parent"
        android:layout_height="match_parent"
        app:layout_constraintBottom_toBottomOf="parent"
        app:layout_constraintEnd_toEndOf="parent"
        app:layout_constraintStart_toStartOf="parent"
        app:layout_constraintTop_toTopOf="parent" />

</androidx.constraintlayout.widget.ConstraintLayout>
<?xml version="1.0" encoding="utf-8"?>
<LinearLayout xmlns:android="http://schemas.android.com/apk/res/android"
    xmlns:app="http://schemas.android.com/apk/res-auto"
    xmlns:tools="http://schemas.android.com/tools"
    android:orientation="horizontal" android:layout_width="match_parent"
    android:layout_height="wrap_content"
    >

    <androidx.constraintlayout.widget.ConstraintLayout
        android:layout_width="match_parent"
        android:layout_height="match_parent"
        android:layout_margin="10dp"

        >

        <TextView
            android:id="@+id/textView_child1"
            android:layout_width="wrap_content"
            android:layout_height="wrap_content"
            android:layout_gravity="center_vertical"
            android:paddingLeft="30px"
            android:paddingTop="10px"
            android:paddingBottom="5px"
            android:text="title"
            android:textSize="20sp"
            app:layout_constraintBottom_toBottomOf="parent"
            app:layout_constraintEnd_toEndOf="parent"
            app:layout_constraintStart_toStartOf="parent"
            app:layout_constraintTop_toTopOf="parent" />

        <TextView
            android:id="@+id/textView_child2"
            android:layout_width="wrap_content"
            android:layout_height="wrap_content"
            android:layout_gravity="center_vertical"
            android:paddingLeft="30px"
            android:paddingTop="10px"
            android:paddingBottom="5px"
            android:text="title"
            android:textSize="20sp"
            app:layout_constraintBottom_toBottomOf="parent"
            app:layout_constraintEnd_toStartOf="@+id/textView_child1"
            app:layout_constraintStart_toStartOf="parent"
            app:layout_constraintTop_toTopOf="parent" />

    </androidx.constraintlayout.widget.ConstraintLayout>
</LinearLayout>
<?xml version="1.0" encoding="utf-8"?>
<LinearLayout xmlns:android="http://schemas.android.com/apk/res/android"
    android:orientation="vertical" android:layout_width="match_parent"
    android:layout_height="match_parent">

    <LinearLayout
        android:layout_width="match_parent"
        android:layout_height="match_parent"
        android:layout_marginStart="5dp"
        android:layout_marginTop="20dp"
        android:layout_marginBottom="20dp"
        >

        <TextView
            android:id="@+id/textView_ItemTitle"
            android:layout_width="match_parent"
            android:layout_height="wrap_content"
            android:layout_weight="1"
            android:text="TextView"
            android:layout_marginStart="50dp"
            android:textAppearance="@style/TextAppearance.AppCompat.Large" />
    </LinearLayout>
2-2.創建實體類
來創建實體類吧!首先在資料夾下點右鍵->New->JavaClass
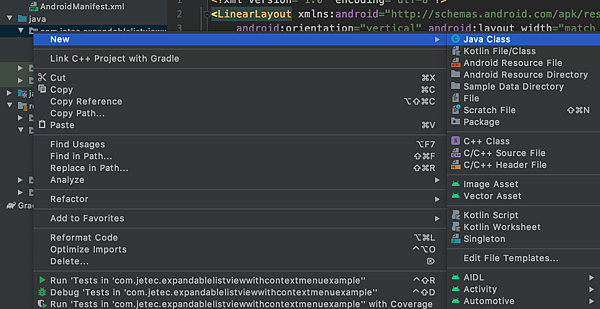
新版的Android studio介面有點不一樣
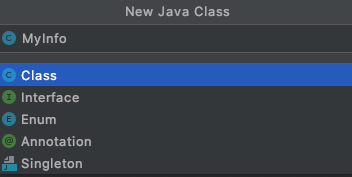
這邊直接OK就好
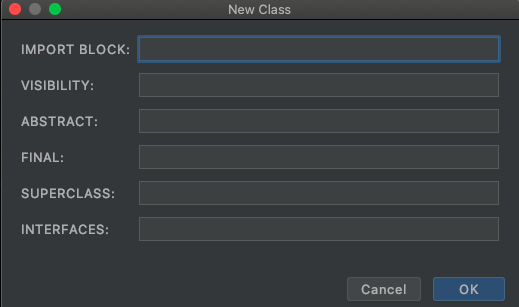
然後輸入以下實體類就搞定囉
/**實體類(getter-setter)*/
class MyInfo {

    private String title;//大標題的文字
    private ArrayList<HashMap<String,String>> arrayList;//每個群組的內容

    public MyInfo(String title, ArrayList<HashMap<String,String>> arrayList) {
        this.title = title;
        this.arrayList = arrayList;
    }
    public String getTitle() {
        return title;
    }
    public ArrayList<HashMap<String, String>> getArrayList() {
        return arrayList;
    }
}
3.建立基本ExpandableListView
接下來都在MainActivity裡面完成,主要就是要撰寫功能了
首先先來建立ExpandableListView雙層清單的Adapter吧
請在onCreate的外面建立一個class,並繼承BaseExpandableListAdapter
像這樣

然後載入所有方法
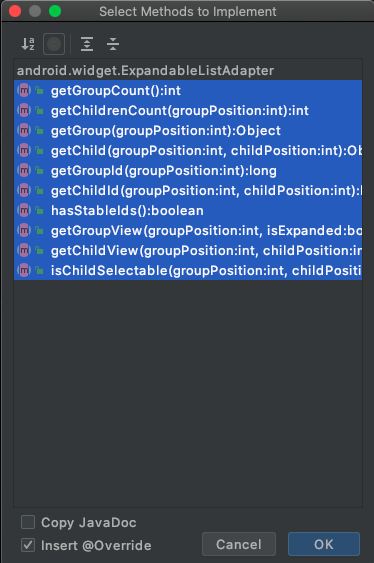
這些方法詳細的都有在前一篇講過,想了解詳細請參考這篇文章
->碼農日常-『Android studio』ExpandableListView(抽屜式列表、可展開式ListView)之基本用法
接著我就直接PO Adapter內全部的內容吧,直接複製就好
private class ExpandableListAdapter extends BaseExpandableListAdapter {
    private List<MyInfo> infoArray;

    /**
     * 將現在顯示的內容陣列傳出去
     */
    public List<MyInfo> getInfoArray() {
        return infoArray;
    }

    /**
     * 移除所選定的群組
     */
    public void removeByPosition(int selectedPosition) {
        infoArray.remove(selectedPosition);
        notifyDataSetChanged();
    }

    /**
     * 建構子
     */
    public ExpandableListAdapter(List<MyInfo> infoArray) {
        this.infoArray = infoArray;
    }

    @Override
    public int getGroupCount() {
        return infoArray.size();
    }

    @Override
    public int getChildrenCount(int groupPosition) {
        return infoArray.get(groupPosition).getArrayList().size();
    }

    @Override
    public Object getGroup(int groupPosition) {
        return groupPosition;
    }

    @Override
    public Object getChild(int groupPosition, int childPosition) {
        return childPosition;
    }

    @Override
    public long getGroupId(int groupPosition) {
        return groupPosition;
    }

    @Override
    public long getChildId(int groupPosition, int childPosition) {
        return childPosition;
    }

    @Override
    public boolean hasStableIds() {
        return false;
    }

    /**
     * 設置大群組(父層)的介面
     */
    @Override
    public View getGroupView(int groupPosition, boolean isExpanded, View convertView, ViewGroup parent) {
        if (convertView == null) {
            LayoutInflater inflater = (LayoutInflater) MainActivity.this
                    .getSystemService(Context.LAYOUT_INFLATER_SERVICE);
            convertView = inflater.inflate(R.layout.expandlistview_item, null);
        }
        convertView.setTag(R.layout.expandlistview_item, groupPosition);
        TextView textView = convertView.findViewById(R.id.textView_ItemTitle);
        textView.setText(infoArray.get(groupPosition).getTitle());
        return convertView;
    }

    /**
     * 設置小群組(子層)的介面
     */
    @Override
    public View getChildView(int groupPosition, int childPosition, boolean isLastChild, View convertView, ViewGroup parent) {
        if (convertView == null) {
            LayoutInflater inflater = (LayoutInflater) MainActivity.this
                    .getSystemService(Context.LAYOUT_INFLATER_SERVICE);
            convertView = inflater.inflate(R.layout.expandlistview_child, null);
        }
        convertView.setTag(R.layout.expandlistview_child, groupPosition);
        TextView child1 = convertView.findViewById(R.id.textView_child1);
        TextView child2 = convertView.findViewById(R.id.textView_child2);
        child1.setText(infoArray.get(groupPosition).getArrayList().get(childPosition).get("First"));
        child2.setText(infoArray.get(groupPosition).getArrayList().get(childPosition).get("Second"));
        return convertView;
    }

    /**
     * 可以在這邊設置是否要讓內容項目可以被點擊顯示ContextView
     */
    @Override
    public boolean isChildSelectable(int groupPosition, int childPosition) {
        return false;
    }
}//ExpandableListAdapter
以上這些,直接全部複製到onCreate的外面就好囉!
再來是外部要設置ExpandableListView了
public class MainActivity extends AppCompatActivity {
    ExpandableListAdapter mAdapter;//為使方便,設置ExpandableListAdapter為全域變數

    @Override
    protected void onCreate(Bundle savedInstanceState) {
        super.onCreate(savedInstanceState);
        setContentView(R.layout.activity_main);
        ExpandableListView expandableListView = findViewById(R.id.expandListView);
        mAdapter = new ExpandableListAdapter(setData());
        expandableListView.setAdapter(mAdapter);
    }//onCreate

    /**
     * 使用實體類MyInfo.java製作資料
     */
    private static List<MyInfo> setData() {
        ArrayList<HashMap<String, String>> arrayList = new ArrayList<>();
        for (int i = 0; i < 3; i++) {
            HashMap<String, String> hashMap = new HashMap<>();
            hashMap.put("First", "內容A-" + i);
            hashMap.put("Second", "內容B-" + i);
            arrayList.add(hashMap);
        }
        List<MyInfo> myInfo = new ArrayList<>();
        for (int i = 0; i < 4; i++) {
            myInfo.add(new MyInfo("標題" + i, arrayList));
        }
        return myInfo;
    }//setData
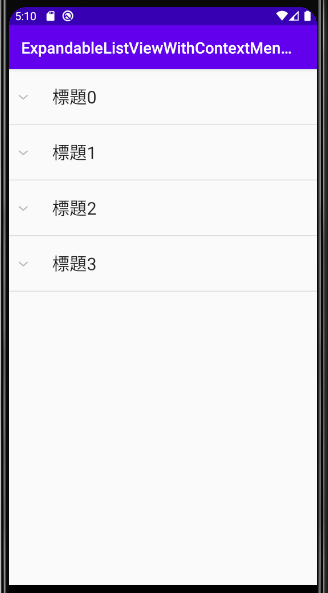
這時候按下執行,就能看見一般的雙層清單囉!
4.建立長點擊後顯示ContextMenu
接下來就是長點擊後顯示清單了(`▽´)
ContextMenu這個辭不是我創的XD,是本身Android就有這個元件
相關資料在這邊
->https://developer.android.com/reference/android/view/ContextMenu
查詢關鍵字的話也會有很多資料~大家試著去搜看看吧(`・ω・´)+
不過用ExpandableListView搭配的文章不太多就是了QQ
好啦廢話不要說太多,開始吧
首先按下crtl+o,找到這個介面
並複寫onCreateContextMenu & onContextItemSelected
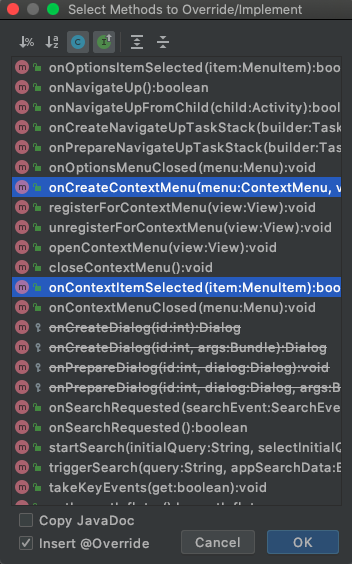
然後會出現這樣的畫面
@Override
public void onCreateContextMenu(ContextMenu menu, View v, ContextMenu.ContextMenuInfo menuInfo) {
    super.onCreateContextMenu(menu, v, menuInfo);
}

@Override
public boolean onContextItemSelected(@NonNull MenuItem item) {
    return super.onContextItemSelected(item);
}
分別來寫入內容吧,首先是onCreateContextMenu
顧名思義,這個複寫就是用來寫ContextMenu要顯示的內容的
那麼就直接寫入吧
@Override
public void onCreateContextMenu(ContextMenu menu, View v, ContextMenu.ContextMenuInfo menuInfo) {
    /**取得所點選到的ExpandableListView的父層位置or子層位置*/
    ExpandableListView.ExpandableListContextMenuInfo info = (ExpandableListView.ExpandableListContextMenuInfo) menuInfo;
    int type = ExpandableListView.getPackedPositionType(info.packedPosition);
    int groupPosition = ExpandableListView.getPackedPositionGroup(info.packedPosition);
    int childPosition = ExpandableListView.getPackedPositionChild(info.packedPosition);

    /**此處為判斷點到的ContextMenu是屬於大群組(父層)還是小群組(子層)*/
    if (type == ExpandableListView.PACKED_POSITION_TYPE_GROUP) {
        menu.setHeaderTitle(mAdapter.getInfoArray().get(groupPosition).getTitle()+ "操作");
        menu.add(0, 0, 1, "取得資訊");
        menu.add(0, 1, 2, "刪除群組");
        menu.add(0, 2, 3, "取消操作");
    } else if (type == ExpandableListView.PACKED_POSITION_TYPE_CHILD) {//目前沒開啟child點擊功能
        menu.setHeaderTitle("小標題" + childPosition + "資訊");
        menu.add(0, 0, 1, "小資訊");
    }
}
其中menu.add()的部分
其實從我的編輯器看是長這樣(有提示的)

grouupId是指說可以幫你的選項分門別類,而今天主要使用的是itemId還有order
order是決定這些元件在Menu中的次序,而itemId則是幫助之後點選事件內可辨別點了哪個item之用
最後就是onContextItemSelected的部分了
@Override
public boolean onContextItemSelected(@NonNull MenuItem item) {
    /**取得所點選到的ExpandableListView的父層位置or子層位置*/
    ExpandableListView.ExpandableListContextMenuInfo info = (ExpandableListView.ExpandableListContextMenuInfo) item
            .getMenuInfo();
    int type = ExpandableListView.getPackedPositionType(info.packedPosition);
    int groupPosition = ExpandableListView.getPackedPositionGroup(info.packedPosition);
    int childPosition = ExpandableListView.getPackedPositionChild(info.packedPosition);
    /**如果點選的是大群組(父層)的視窗操作*/
    if (type == ExpandableListView.PACKED_POSITION_TYPE_GROUP) {
        switch (item.getItemId()) {
            case 0://點選的是"取得資訊"
                Toast.makeText(this, mAdapter.getInfoArray().get(groupPosition).getTitle(), Toast.LENGTH_SHORT).show();
                break;
            case 1://點選的是"刪除"
                mAdapter.removeByPosition(groupPosition);
                break;
            case 2://點選的是"取消操作"
                Toast.makeText(this, "什麼都不做", Toast.LENGTH_SHORT).show();
                break;
        }
    } /**如果點選的是小群組(子層)的視窗操作*/
    else if (type == ExpandableListView.PACKED_POSITION_TYPE_CHILD) {
        // 原理做法跟上面一樣,大家可以試著加入要做的事哦:D
    }
    return super.onContextItemSelected(item);
}
綠底的部分是在前面Adapter內有寫過的刪除方法哦,顯示紅字的話切回去看吧!(正常是不會)
最後放上MainActivity的全部吧(´・з・)
public class MainActivity extends AppCompatActivity {
    ExpandableListAdapter mAdapter;//為使方便,設置ExpandableListAdapter為全域變數

    @Override
    protected void onCreate(Bundle savedInstanceState) {
        super.onCreate(savedInstanceState);
        setContentView(R.layout.activity_main);

        ExpandableListView expandableListView = findViewById(R.id.expandListView);
        mAdapter = new ExpandableListAdapter(setData());
        expandableListView.setAdapter(mAdapter);
        /**將指定的ExpandableListView綁定使之可被原生的ContextMenu操作*/
        registerForContextMenu(expandableListView);
    }//onCreate
    /**使用實體類MyInfo.java製作資料*/
    private static List<MyInfo> setData() {
        ArrayList<HashMap<String,String>> arrayList = new ArrayList<>();
        for (int i = 0; i <3 ; i++) {
            HashMap<String,String> hashMap = new HashMap<>();
            hashMap.put("First","內容A-"+i);
            hashMap.put("Second","內容B-"+i);
            arrayList.add(hashMap);
        }
        List<MyInfo> myInfo = new ArrayList<>();
        for (int i = 0; i <4 ; i++) {
            myInfo.add(new MyInfo("標題"+i,arrayList));
        }
        return myInfo;
    }//setData
    /**複寫新增長按顯示選單視窗*/
    @Override
    public void onCreateContextMenu(ContextMenu menu, View v, ContextMenu.ContextMenuInfo menuInfo) {
        super.onCreateContextMenu(menu, v, menuInfo);
        /**取得所點選到的ExpandableListView的父層位置or子層位置*/
        ExpandableListView.ExpandableListContextMenuInfo info = (ExpandableListView.ExpandableListContextMenuInfo) menuInfo;
        int type = ExpandableListView.getPackedPositionType(info.packedPosition);
        int groupPosition = ExpandableListView.getPackedPositionGroup(info.packedPosition);
        int childPosition = ExpandableListView.getPackedPositionChild(info.packedPosition);

        /**此處為判斷點到的ContextMenu是屬於大群組(父層)還是小群組(子層)*/
        if (type == ExpandableListView.PACKED_POSITION_TYPE_GROUP) {
            menu.setHeaderTitle(mAdapter.getInfoArray().get(groupPosition).getTitle()+ "操作");
            menu.add(0, 0, 1, "取得資訊");
            menu.add(0, 1, 2, "刪除群組");
            menu.add(0, 2, 3, "取消操作");
        } else if (type == ExpandableListView.PACKED_POSITION_TYPE_CHILD) {//目前沒開啟child點擊功能
            menu.setHeaderTitle("小標題" + childPosition + "資訊");
            menu.add(0, 0, 1, "小資訊");
        }
    }
    /**複寫點擊選單視窗的內容後要做的事*/
    @Override
    public boolean onContextItemSelected(@NonNull MenuItem item) {
        /**取得所點選到的ExpandableListView的父層位置or子層位置*/
        ExpandableListView.ExpandableListContextMenuInfo info = (ExpandableListView.ExpandableListContextMenuInfo) item
                .getMenuInfo();
        int type = ExpandableListView.getPackedPositionType(info.packedPosition);
        int groupPosition = ExpandableListView.getPackedPositionGroup(info.packedPosition);
        int childPosition = ExpandableListView.getPackedPositionChild(info.packedPosition);
        /**如果點選的是大群組(父層)的視窗操作*/
        if (type == ExpandableListView.PACKED_POSITION_TYPE_GROUP) {
            switch (item.getItemId()) {
                case 0://點選的是"取得資訊"
                    Toast.makeText(this, mAdapter.getInfoArray().get(groupPosition).getTitle(), Toast.LENGTH_SHORT).show();
                    break;
                case 1://點選的是"刪除"
                    mAdapter.removeByPosition(groupPosition);
                    break;
                case 2://點選的是"取消操作"
                    Toast.makeText(this, "什麼都不做", Toast.LENGTH_SHORT).show();
                    break;
            }
        } /**如果點選的是小群組(子層)的視窗操作*/
        else if (type == ExpandableListView.PACKED_POSITION_TYPE_CHILD) {
            // 原理做法跟上面一樣,大家可以試著加入要做的事哦:D
        }
        return super.onContextItemSelected(item);
    }
    /**
     * ====================================ExpandableList的適配器===================================
     */
    private class ExpandableListAdapter extends BaseExpandableListAdapter {
        private List<MyInfo> infoArray;
        /**將現在顯示的內容陣列傳出去*/
        public List<MyInfo> getInfoArray() {
            return infoArray;
        }
        /**移除所選定的群組*/
        public void removeByPosition(int selectedPosition) {
            infoArray.remove(selectedPosition);
            notifyDataSetChanged();
        }
        /**建構子*/
        public ExpandableListAdapter(List<MyInfo> infoArray) {
            this.infoArray = infoArray;
        }

        @Override
        public int getGroupCount() {
            return infoArray.size();
        }

        @Override
        public int getChildrenCount(int groupPosition) {
            return infoArray.get(groupPosition).getArrayList().size();
        }

        @Override
        public Object getGroup(int groupPosition) {
            return groupPosition;
        }

        @Override
        public Object getChild(int groupPosition, int childPosition) {
            return childPosition;
        }

        @Override
        public long getGroupId(int groupPosition) {
            return groupPosition;
        }

        @Override
        public long getChildId(int groupPosition, int childPosition) {
            return childPosition;
        }

        @Override
        public boolean hasStableIds() {
            return false;
        }
        /**設置大群組(父層)的介面*/
        @Override
        public View getGroupView(int groupPosition, boolean isExpanded, View convertView, ViewGroup parent) {
            if (convertView == null) {
                LayoutInflater inflater = (LayoutInflater) MainActivity.this
                        .getSystemService(Context.LAYOUT_INFLATER_SERVICE);
                convertView = inflater.inflate(R.layout.expandlistview_item, null);
            }
            convertView.setTag(R.layout.expandlistview_item, groupPosition);
            TextView textView = convertView.findViewById(R.id.textView_ItemTitle);
            textView.setText(infoArray.get(groupPosition).getTitle());
            return convertView;
        }
        /**設置小群組(子層)的介面*/
        @Override
        public View getChildView(int groupPosition, int childPosition, boolean isLastChild, View convertView, ViewGroup parent) {
            if (convertView == null) {
                LayoutInflater inflater = (LayoutInflater) MainActivity.this
                        .getSystemService(Context.LAYOUT_INFLATER_SERVICE);
                convertView = inflater.inflate(R.layout.expandlistview_child, null);
            }
            convertView.setTag(R.layout.expandlistview_child, groupPosition);
            TextView child1 = convertView.findViewById(R.id.textView_child1);
            TextView child2 = convertView.findViewById(R.id.textView_child2);
            child1.setText(infoArray.get(groupPosition).getArrayList().get(childPosition).get("First"));
            child2.setText(infoArray.get(groupPosition).getArrayList().get(childPosition).get("Second"));
            return convertView;
        }
        /**可以在這邊設置是否要讓內容項目可以被點擊顯示ContextView*/
        @Override
        public boolean isChildSelectable(int groupPosition, int childPosition) {
            return false;
        }
    }//ExpandableListAdapter
結語
其實我發現這項功能是屬於不太會被(外行人)要求的功能XD<-個人觀感
可能因為客人如果想要求這項功能的話也不知道如何溝通吧(´・д・`)
沒啦,一切只是個人觀感而已,並不代表所有立場喔ㄏ
在這次的範例中,與前次範例不同的是
這次的範例使用了實體類去完成陣列,整體來說程式是比之前較為簡潔的
但之前一方面是當時我自己也還不熟練使用;另一方面也為了照顧初學者才不使用
以我自己而言,從前我是不喜歡把很多程式分開成不一樣的類別寫的
但後來為了程式簡潔,只能分開很多寫....但是為了日後的接班我程式的人,就只能寫很多註解了.....(´υ`)
那這次的內容希望大家有收穫,再會!


 留言列表
留言列表
