今天的內容是關於各位使用手機中非常常用的功能~
"螢幕截圖"(-‿◦)
我是不知道其他人如何啦,不過螢幕截圖一直都算是各款手機的標配功能
那麼有次由於專案的緣故,我必須要在儲存資料時另外儲存一張螢幕截圖
於是乎我就研究了一下...莫名地發現蠻簡單的!(゜ロ゜)
先來看一看今天的功能吧!
這次沒有Github哦
1. 介面與邏輯
總之先來看一下介面吧
activity_main.xml

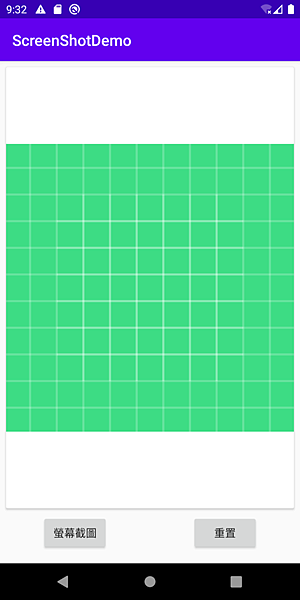
總之在畫面中放上一個CardView,然後在裡面放上一個ImageView
然後左下角的按鈕即是螢幕截圖,也就是按下去後會把目前的畫面顯示在ImageView上
最後右邊的按鈕則是把畫面洗回基礎圖底,完成一個輪迴
來貼給你介面程式碼
<?xml version="1.0" encoding="utf-8"?>
<androidx.constraintlayout.widget.ConstraintLayout xmlns:android="http://schemas.android.com/apk/res/android"
    xmlns:app="http://schemas.android.com/apk/res-auto"
    xmlns:tools="http://schemas.android.com/tools"
    android:layout_width="match_parent"
    android:layout_height="match_parent"
    tools:context=".MainActivity">

    <Button
        android:id="@+id/button_Shot"
        android:layout_width="wrap_content"
        android:layout_height="wrap_content"
        android:layout_marginBottom="16dp"
        android:text="螢幕截圖"
        app:layout_constraintBottom_toBottomOf="parent"
        app:layout_constraintEnd_toStartOf="@+id/guideline2"
        app:layout_constraintStart_toStartOf="parent" />

    <androidx.cardview.widget.CardView
        android:layout_width="0dp"
        android:layout_height="0dp"
        android:layout_marginStart="8dp"
        android:layout_marginTop="8dp"
        android:layout_marginEnd="8dp"
        android:layout_marginBottom="8dp"
        android:elevation="20dp"
        app:layout_constraintBottom_toTopOf="@+id/button_Shot"
        app:layout_constraintEnd_toEndOf="parent"
        app:layout_constraintStart_toStartOf="parent"
        app:layout_constraintTop_toTopOf="parent">

        <ImageView
            android:id="@+id/imageView_Show"
            android:layout_width="match_parent"
            android:layout_height="match_parent"
            app:srcCompat="@drawable/ic_launcher_background" />
    </androidx.cardview.widget.CardView>

    <androidx.constraintlayout.widget.Guideline
        android:id="@+id/guideline2"
        android:layout_width="wrap_content"
        android:layout_height="wrap_content"
        android:orientation="vertical"
        app:layout_constraintGuide_percent="0.5" />

    <Button
        android:id="@+id/button_Result"
        android:layout_width="wrap_content"
        android:layout_height="wrap_content"
        android:layout_marginBottom="16dp"
        android:text="重置"
        app:layout_constraintBottom_toBottomOf="parent"
        app:layout_constraintEnd_toEndOf="parent"
        app:layout_constraintStart_toStartOf="@+id/guideline2"
        app:layout_constraintTop_toTopOf="@+id/button_Shot" />
</androidx.constraintlayout.widget.ConstraintLayout>
介面就到此為止,接下來進入重點囉:D
2. 程式內容
直接PO全部,再回頭看內容吧
public class MainActivity extends AppCompatActivity {

    @SuppressLint("UseCompatLoadingForDrawables")
    @Override
    protected void onCreate(Bundle savedInstanceState) {
        super.onCreate(savedInstanceState);
        setContentView(R.layout.activity_main);
        Button btShot = findViewById(R.id.button_Shot);
        Button btRes = findViewById(R.id.button_Result);
        ImageView igShow = findViewById(R.id.imageView_Show);
        btShot.setOnClickListener(v->{
            igShow.setImageBitmap(getScreenShot());
        });
        btRes.setOnClickListener(v -> {
            igShow.setImageDrawable(getDrawable(R.drawable.ic_launcher_background));
        });
    }


    private Bitmap getScreenShot(){
        //將螢幕畫面存成一個View
        View view = getWindow().getDecorView();
        view.setDrawingCacheEnabled(true);
        view.buildDrawingCache();
        Bitmap fullBitmap = view.getDrawingCache();
        //取得系統狀態欄高度
        Rect rect = new Rect();
        getWindow().getDecorView().getWindowVisibleDisplayFrame(rect);
        int statusBarHeight = rect.top;
        //取得手機長、寬
        int phoneWidth = getWindowManager().getDefaultDisplay().getWidth();
        int phoneHeight = getWindowManager().getDefaultDisplay().getHeight();
        //將螢幕快取到的圖片修剪尺寸(去掉status bar)後,存成Bitmap
        Bitmap bitmap = Bitmap.createBitmap(fullBitmap,0,statusBarHeight,phoneWidth
                ,phoneHeight-statusBarHeight);
        //清除螢幕截圖快取,避免內存洩漏
        view.destroyDrawingCache();
        return bitmap;

    }
}
OK,看得懂程式的可以直接複製完閃人囉( ・ὢ・ )
欸不對不帶這樣的啊!!起碼幫我拍個讚賞公民啊喂XDDDDDDD
嗯哼..總之重點是這一段
private Bitmap getScreenShot(){
    //將螢幕畫面存成一個View
    View view = getWindow().getDecorView();
    view.setDrawingCacheEnabled(true);
    view.buildDrawingCache();
    Bitmap fullBitmap = view.getDrawingCache();
    //取得系統狀態欄高度
    Rect rect = new Rect();
    getWindow().getDecorView().getWindowVisibleDisplayFrame(rect);
    int statusBarHeight = rect.top;
    //取得手機長、寬
    int phoneWidth = getWindowManager().getDefaultDisplay().getWidth();
    int phoneHeight = getWindowManager().getDefaultDisplay().getHeight();
    //將螢幕快取到的圖片修剪尺寸(去掉status bar)後,存成Bitmap
    Bitmap bitmap = Bitmap.createBitmap(fullBitmap,0,statusBarHeight,phoneWidth
            ,phoneHeight-statusBarHeight);
    //清除螢幕截圖快取,避免內存洩漏
    view.destroyDrawingCache();
    return bitmap;

}
在View中有提供一個方法擷取螢幕畫面
而欲擷取畫面,必須得先把"類似?"權限的東西開啟後才擷取
最後擷取出來的結果便是全螢幕(包含狀態欄的截圖)
...也就是說Google早就幫你把方法寫好了的說..
上述的那些說明也就是這些內容
//將螢幕畫面存成一個View
View view = getWindow().getDecorView();
view.setDrawingCacheEnabled(true);
view.buildDrawingCache();
Bitmap fullBitmap = view.getDrawingCache();
再來我們想要去掉狀態欄,那我們該怎麼做?
沒錯,就是先算好狀態欄的尺寸之後,再從全螢幕去修剪它
算狀態欄以及手機長寬的的尺寸就是這幾行
//取得系統狀態欄高度
Rect rect = new Rect();
getWindow().getDecorView().getWindowVisibleDisplayFrame(rect);
int statusBarHeight = rect.top;
//取得手機長、寬
int phoneWidth = getWindowManager().getDefaultDisplay().getWidth();
int phoneHeight = getWindowManager().getDefaultDisplay().getHeight();
再來,將圖片放到Bitmap類裡面
Bitmap bitmap = Bitmap.createBitmap(fullBitmap,0,statusBarHeight,phoneWidth
        ,phoneHeight-statusBarHeight);
最後,清除螢幕快取
view.destroyDrawingCache();
以上操作,便是一個截圖的過程
其實..真的比想像中得簡單XDDDDDD
今天是連假,我跟幾個朋友騎機車上清境去玩了(;´д`)ゞ
這篇文章坦白講是在民宿裡朋友們都睡去之後才開始打的
其實近期一直很煩惱,最近都沒什麼功能可以寫
簡單來說我有點快沒梗了QQ
不過換個角度想,覺得Android領域學海無涯,一定還有很多文章可以寫
如果一直研究的話,寫個10年應該都不是問題才是(嘆..)( ´_ゝ`)
喔對了,近期我也再經營馬特市了
馬特市我會寫一些我自己的一些人生觀跟我身邊發生的事...算是可以比較輕鬆賞文的類型
所以...有空來看看吧!
→https://matters.news/@thumbb13555
最後,如果各位覺得我的文章有幫助..


 留言列表
留言列表
