這週來聊聊關於DrawerLayout(/・0・)
關於DrawerLayout,有很多種叫法
什麼側滑選單、側滑視窗、側邊選單、側滑菜單什麼的一大堆
那NavigationView又是什麼?
來看看官網怎麼說
->https://developer.android.com/reference/com/google/android/material/navigation/NavigationView
這邊:
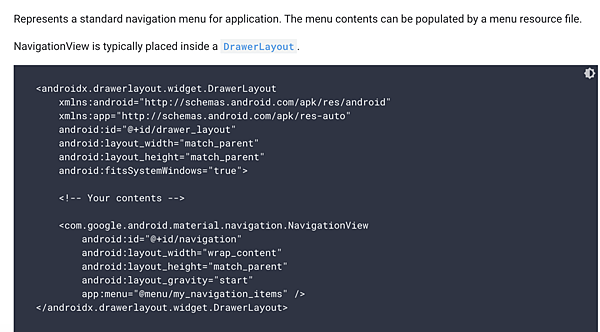
上面有一行字寫道
Represents a standard navigation menu for application. The menu contents can be populated by a menu resource file.
NavigationView is typically placed inside a DrawerLayout.
大致意思是:(範例中)是最標準最具代表性的Navigation menu用法,而menu的內容可由menu的資源檔套入
而NavigationView通常是被放置在DrawerLayout之中
OK,也就是說DrawerLayout一定都會是在整個畫面的"最下層",而NavigationView一定得包在其中
大致就是這樣的一個觀念
那最後顛覆大家一個觀念...
其實....包在DrawerLayout的元件內,不一定一定得用NavagationView才能完成
如果你的側滑視窗內容想放一些非菜單類的東西的話
像是這樣:

類似於工程師模式的東西,那這時候其實就可以不用使用NavigationView也能辦到(・ω・)b
好的講完了就來上今天的功能
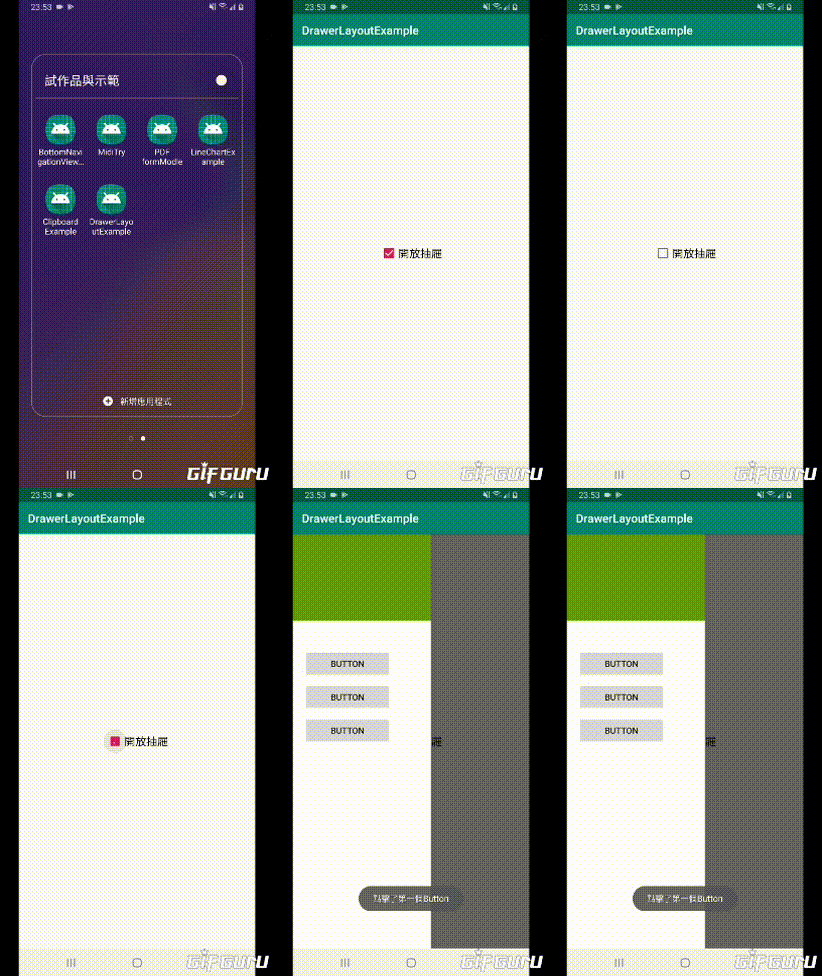
以及Github
https://github.com/thumbb13555/DrawerLayoutExample
開始~
0.功能簡介及加入依賴
0-1.功能描述
首先來闡述一下完整功能
- 加入側滑視窗
- 在側滑視窗內隨便放點東西
- 在開啟視窗期間按下回車鍵◀︎,則收回視窗
- 製作一個CheckBox管理是否要開啟側滑視窗
0-2.加入依賴
以整個專案而言,如果只使用DrawerLayout而不加入NavigationView的話
那麼是不需要載入依賴包的
不過如果是要用到NavigationView的話就必須載入Google的設計依賴包
包的GitHub位址
下載包的mevn位址(2020/1/23最新版)
->https://mvnrepository.com/artifact/com.google.android.material/material/1.2.0-alpha04
以及我目前使用的版本
implementation 'com.google.android.material:material:1.2.0-alpha04'
請將這行複製起來
然後進到build.gradle

加在dependencies之下

按下Sync Now即完成加入依賴包

1.撰寫界面
這次的介紹中,反而程Xml的部分才是重點(`・ω・´)+
其實如果按正常操作,其實光寫完xml後基本動作Google大神們都幫你把套件寫好了
那就開始搞吧!
首先在來到activity_main.xml內

點擊Text來到xml編寫
將原先的Layout

改為
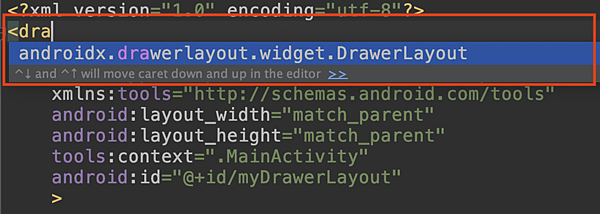
按下去(´・з・)
這樣就完成基本設定
再來如果是沒加NavigationView的朋友
請隨意加入一個Layout(我加入LinearLayout)
<LinearLayout
     android:layout_width="240dp"
     android:layout_height="match_parent"
     android:layout_gravity="start"
    >

</LinearLayout>
在設定上要特別留意
他的寬度一定得小於整個畫面的寬度
就經驗而言240dp最恰當
再來要設置
android:layout_gravity="start"
讓子畫面是由左邊拉出。
這個部分就是控制他要從哪邊出現
如果是
android:layout_gravity="end"
就是從右邊拉出
在開發的時候,因為這些設定會執行
所以通常我都是在把內部元件做好後才把這個設定載進去( ´_ゝ`)
好這時候基本上就可以執行了
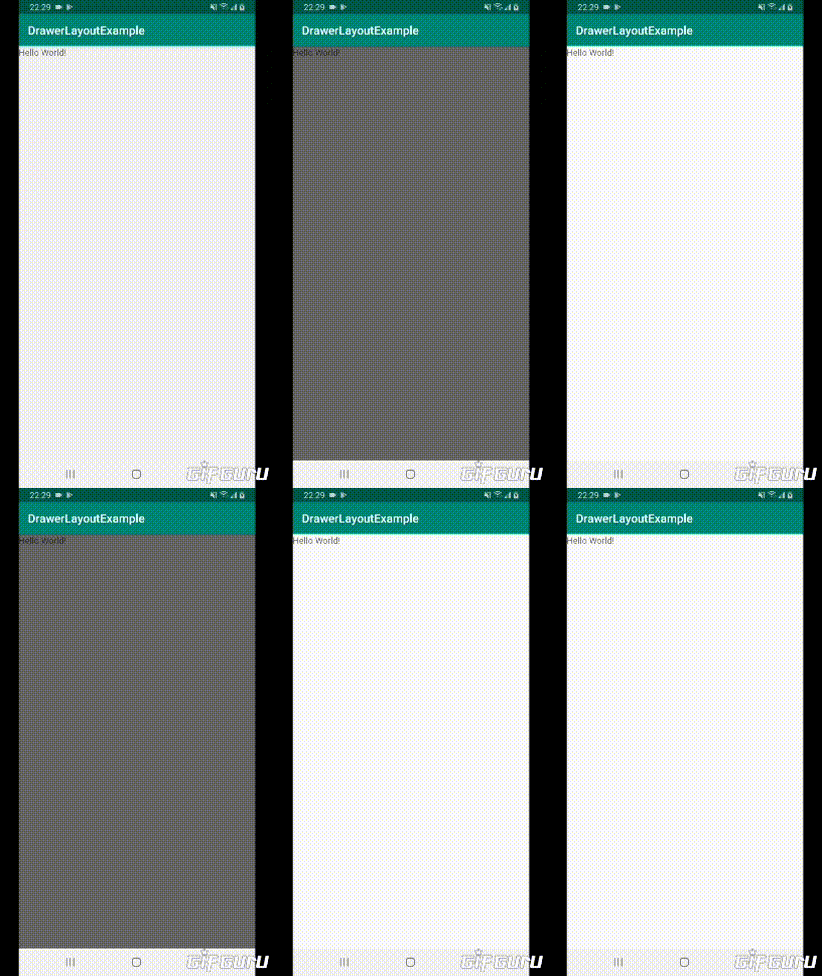

WTF??
什麼鬼啊(╯=▃=)╯︵┻━┻
好啦其實是這樣的
因為這個介面預設就是透明的
因此我們必須再加入背景色才會正常顯示
所以把內容改這樣
<LinearLayout
        android:layout_width="240dp"
        android:layout_height="match_parent"
        android:layout_gravity="start"
        android:background="@android:color/white"
      >
   <!--要包在視窗內的元件 -->
</LinearLayout>
那麼有安裝NavigationView的朋友呢?
其實設定上都是一樣的,完全沒什麼差別
像這樣
<com.google.android.material.navigation.NavigationView
        android:layout_width="240dp"
        android:layout_height="match_parent"
        android:layout_gravity="start"
        android:background="@android:color/white">

    <!--要包在視窗內的元件 -->

</com.google.android.material.navigation.NavigationView>
是不是一模一樣呢XD
這時候按下執行,就能實現囉!(・ω・)b
2.在側滑菜單裝加入按鈕及其他元件,並控制之
2-1.加入按鈕控件
其實沒什麼難的,我直接放xml就好
<com.google.android.material.navigation.NavigationView
        android:layout_width="240dp"
        android:layout_height="match_parent"
        android:layout_gravity="start"
        android:background="@android:color/white">

        <LinearLayout
            android:layout_width="match_parent"
            android:layout_height="wrap_content"
            android:orientation="vertical">

            <LinearLayout
                android:layout_width="match_parent"
                android:layout_height="150dp"
                android:layout_weight="1"
                android:background="@android:color/holo_green_dark"
                android:orientation="vertical" />

            <Button
                android:id="@+id/button3"
                android:layout_width="150dp"
                android:layout_height="wrap_content"
                android:layout_marginStart="20dp"
                android:layout_marginTop="50dp"
                android:layout_weight="1"
                android:text="Button" />

            <Button
                android:id="@+id/button4"
                android:layout_width="150dp"
                android:layout_height="wrap_content"
                android:layout_marginStart="20dp"
                android:layout_marginTop="10dp"
                android:layout_weight="1"
                android:text="Button" />

            <Button
                android:id="@+id/button5"
                android:layout_width="150dp"
                android:layout_height="wrap_content"
                android:layout_marginStart="20dp"
                android:layout_marginTop="10dp"
                android:layout_weight="1"
                android:text="Button" />
        </LinearLayout>
    </com.google.android.material.navigation.NavigationView>
紅色部分就是加入的內容
結果就是這樣
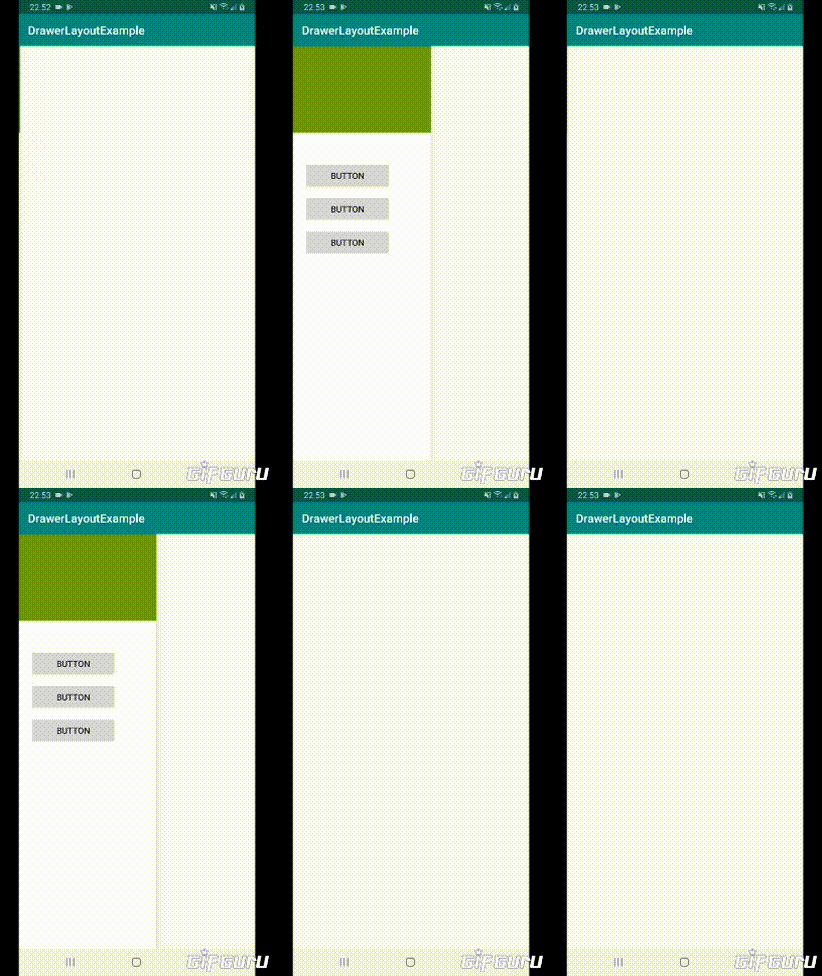
2-2.事件點擊
由於在視窗選單內的元件基本上還是屬於這個畫面的
因此其實跟一般的按鈕操作一樣,搞好ID並控制就好(´・_・`)
範例中我只讓最上面的按鈕點擊有反應
故程式內就是最基本的按鈕觸發事件
像這樣
@Override
    protected void onCreate(Bundle savedInstanceState) {
        super.onCreate(savedInstanceState);
        setContentView(R.layout.activity_main);

        Button bt01 = findViewById(R.id.button3);

        bt01.setOnClickListener((v -> {
            Toast.makeText(this,"點擊了第一個Button",Toast.LENGTH_SHORT).show();
        }));

    }
就這樣(゚д゚;)
3.按下回車鍵時,先偵測側邊視窗是否為打開狀況
這時候的你已經了解了如何使用側滑視窗,並且知道如何控制裡面的元件了
這時候當你按回車鍵時,整個畫面就會退出(不是閃退)(゚A゚;)
這時候注意到一點我上面提過的
☞這個畫面視窗選單基本上還是屬於這個畫面的
所以即使是抽屜視窗開啟中,按下回車鍵視同畫面退出
因此我們必須要想個辦法ノಠ_ಠノ
首先在onCreate的同一層內
按下crtl+O
叫出這個畫面,並找到"onKeyDown"

然後在內部輸入這些碼
@Override
    public boolean onKeyDown(int keyCode, KeyEvent event) {
        if ((keyCode == KeyEvent.KEYCODE_BACK)) {
            if (drawerLayout.isDrawerOpen(GravityCompat.START)) {
                drawerLayout.closeDrawers();
            }else finish();
            return true;
        }
        return super.onKeyDown(keyCode, event);
    }
就可以實踐功能囉~_(┐「ε:)_♡
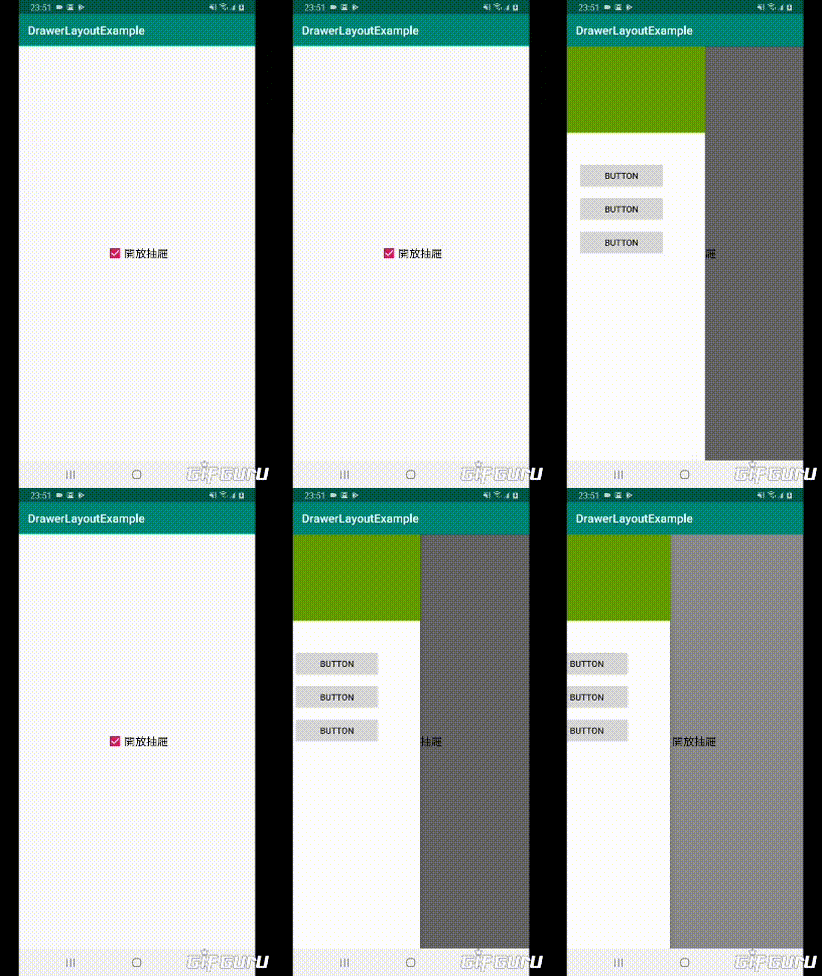
4.加入一個CheckBox決定是否鎖住側滑菜單
最後要來演示如何鎖住側滑菜單不給使用者用
在這之前要知道幾個參數
參考官網的這邊
->https://developer.android.com/reference/android/support/v4/widget/DrawerLayout

這裡顯示的是,如何針對視窗本身做一些行為操作
像是
就是指關掉側滑視窗功能
等等之類的,建議了解一下
那麼我就直接貼程式
activity_main.xml
<?xml version="1.0" encoding="utf-8"?>
<androidx.drawerlayout.widget.DrawerLayout
    xmlns:android="http://schemas.android.com/apk/res/android"
    xmlns:app="http://schemas.android.com/apk/res-auto"
    xmlns:tools="http://schemas.android.com/tools"
    android:layout_width="match_parent"
    android:layout_height="match_parent"
    tools:context=".MainActivity"
    android:id="@+id/myDrawerLayout"
    >


<!--    <LinearLayout-->
<!--        android:layout_width="240dp"-->
<!--        android:layout_height="match_parent"-->
<!--        android:layout_gravity="start"-->
<!--        android:background="@android:color/white"-->
<!--        >-->

<!--    </LinearLayout>-->

    <androidx.constraintlayout.widget.ConstraintLayout
        android:layout_width="match_parent"
        android:layout_height="match_parent">

        <CheckBox
            android:id="@+id/myCheckBox"
            android:layout_width="wrap_content"
            android:layout_height="wrap_content"
            android:checked="true"
            android:text="開放抽屜"
            android:textSize="20dp"
            app:layout_constraintBottom_toBottomOf="parent"
            app:layout_constraintEnd_toEndOf="parent"
            app:layout_constraintStart_toStartOf="parent"
            app:layout_constraintTop_toTopOf="parent" />
    </androidx.constraintlayout.widget.ConstraintLayout>

    <com.google.android.material.navigation.NavigationView
        android:layout_width="240dp"
        android:layout_height="match_parent"
        android:layout_gravity="start"
        android:background="@android:color/white">

        <LinearLayout
            android:layout_width="match_parent"
            android:layout_height="wrap_content"
            android:orientation="vertical">

            <LinearLayout
                android:layout_width="match_parent"
                android:layout_height="150dp"
                android:layout_weight="1"
                android:background="@android:color/holo_green_dark"
                android:orientation="vertical" />

            <Button
                android:id="@+id/button3"
                android:layout_width="150dp"
                android:layout_height="wrap_content"
                android:layout_marginStart="20dp"
                android:layout_marginTop="50dp"
                android:layout_weight="1"
                android:text="Button" />

            <Button
                android:id="@+id/button4"
                android:layout_width="150dp"
                android:layout_height="wrap_content"
                android:layout_marginStart="20dp"
                android:layout_marginTop="10dp"
                android:layout_weight="1"
                android:text="Button" />

            <Button
                android:id="@+id/button5"
                android:layout_width="150dp"
                android:layout_height="wrap_content"
                android:layout_marginStart="20dp"
                android:layout_marginTop="10dp"
                android:layout_weight="1"
                android:text="Button" />
        </LinearLayout>
    </com.google.android.material.navigation.NavigationView>


</androidx.drawerlayout.widget.DrawerLayout>
MainActivity.java
public class MainActivity extends AppCompatActivity {
    DrawerLayout drawerLayout;

    @Override
    protected void onCreate(Bundle savedInstanceState) {
        super.onCreate(savedInstanceState);
        setContentView(R.layout.activity_main);
        drawerLayout = findViewById(R.id.myDrawerLayout);
        Button bt01 = findViewById(R.id.button3);

        bt01.setOnClickListener((v -> {
            Toast.makeText(this,"點擊了第一個Button",Toast.LENGTH_SHORT).show();
        }));

        CheckBox checkBox = findViewById(R.id.myCheckBox);
        if (checkBox.isChecked()){
            drawerLayout.setDrawerLockMode(DrawerLayout.LOCK_MODE_UNLOCKED);
        }else{
            drawerLayout.setDrawerLockMode(DrawerLayout.LOCK_MODE_LOCKED_CLOSED);
        }
        checkBox.setOnCheckedChangeListener((compoundButton,isCheck)->{
            if (isCheck){
                drawerLayout.setDrawerLockMode(DrawerLayout.LOCK_MODE_UNLOCKED);
            }else {
                drawerLayout.setDrawerLockMode(DrawerLayout.LOCK_MODE_LOCKED_CLOSED);
            }
        });

    }


    @Override
    public boolean onKeyDown(int keyCode, KeyEvent event) {
        if ((keyCode == KeyEvent.KEYCODE_BACK)) {
            if (drawerLayout.isDrawerOpen(GravityCompat.START)) {
                drawerLayout.closeDrawers();
            }else finish();
            return true;
        }
        return super.onKeyDown(keyCode, event);
    }

}
紅色部分是抓元件ID
橘色部分是偵測checkBox是否為打勾狀態,有的話則解鎖,沒有則鎖住
綠色部分為處理checkBox的點擊事件
此外
drawerLayout.setDrawerLockMode(DrawerLayout.LOCK_MODE_UNLOCKED);
是不鎖住視窗
drawerLayout.setDrawerLockMode(DrawerLayout.LOCK_MODE_LOCKED_CLOSED);
是鎖住視窗
要特別注意囉(・ωー)~☆
5.坑
在最後執行前,請先檢查一下你的Layout樹狀圖
如果你的樹狀圖長這樣
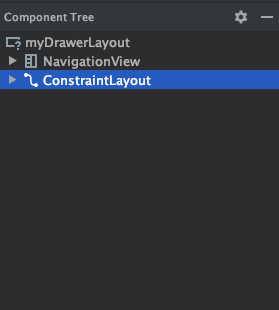
那等一下的執行結果可能會差強人意。。。(ノ_ _)ノ
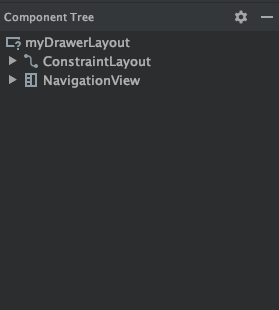
這不知道是怎麼來著,也可能是個彩蛋吧

總之介面必須改成這樣才會正確喔
那今天的DrawerLayout的介紹就到這
希望這篇文章對大家有幫助(・ωー)~☆
如果覺得我文章寫得不錯還請將我的文章放入書籤吧!


 留言列表
留言列表
